INDIAN ARMED FORCES CHIEFS ON
OUR RELENTLESS AND FOCUSED PUBLISHING EFFORTS

SP Guide Publications puts forth a well compiled articulation of issues, pursuits and accomplishments of the Indian Army, over the years
I am confident that SP Guide Publications would continue to inform, inspire and influence.
My compliments to SP Guide Publications for informative and credible reportage on contemporary aerospace issues over the past six decades.
- Interim Defence Budget 2024-25 — An Analysis
- Union Defence budget 2024
- Indian Army: In quest of greater firepower and policy recommendations for gaps
- Indian Army Annual Press Conference 2024
- 6G will transform military-industrial applications
- Tata Boeing Aerospace Delivers 250 AH-64 Apache Fuselages, Manufactured in India
Capture of Haji Pir – Crowning Glory of 1965 War
The capture of Haji Pir by 1 Para (now Special Forces) during the 1965 Indo-Pak War was a great setback to Pakistan’s morale, particularly her army
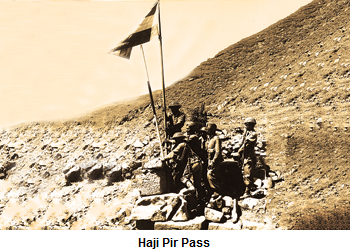
Though many heroic battles were fought by Indian troops during 1947-48 Indo-Pak War hastily inducted into Jammu & Kashmir, no other action by Pakistan hurt India so much strategically and economically than the capture of the Haji Pir. The fact that Pakistan was able to hold on to 78,114 sq km of the state of J&K with her sub-conventional experiment set the course for future blueprint against India. In 1964 Chinese Premier Zhou Enlai, visited Pakistan and suggest to President Ayub Khan that Pakistan should prepare for prolonged conflict with India instead of short-term wars, and raise a militia force to act behind enemy Indian lines. In such backdrop, the capture of the Haji Pir by 1 PARA (now 1 PARA (Special Forces)) during the 1965 Indo-Pak War was great setback to Pakistan’s morale, particularly her army. The Golden Jubilee of capture of Haji Pir was on August 28, 2015.
Strategic Importance of Haji Pir
Haji Pir Pass, at a height of 2,637 metres, is located on the western fringe of the Pir Panjal Range, which divides the Srinagar Valley from Jammu region. Through this Pass a wide, metalled highway connected Srinagar to Jammu via Uri-Ponch–Rajouri, over which bulk of passenger and trade traffic used to ply to and fro. This road is of strategic importance as it connects Uri with Ponch but since major portion of road is in Pakistan-occupied Kashmir (PoK), it cannot be used. Trained Pakistani militants have been sneaking into Kashmir Valley, Ponch and Rajouri districts through this avenue. One of the most pressing operational objectives of the Northern Command, if India were to enter into a conventional battle with Pakistan, would be the strategic pass of Haji Pir which severes the Ponch-Uri route and can provide access to much of PoK.
Pakistan’s Gibraltar Force and Op ‘Grand Slam’
History repeated itself in J&K in 1965 when Pakistani regulars along with Lashkars and Mujahids again infiltrated into the state. Ayub Khan had created a climate of overconfidence that India could be dislodged from J&K through guerrilla operations. Zulfikar Ali Bhutto, Foreign Minister, assessed that once trained Pakistani soldiers entered Kashmir, people of the Valley would rise in revolt while fear of China would prevent India from provoking all out war. So the plan was drawn up for Operation ‘Gibraltar’. Interestingly, Ayub Khan while approving Op ‘Gibraltar’ wrote, “As a general rule Hindu morale would not stand more than a couple of blows delivered at the right time and place. Such opportunities should, therefore, be sought and exploited.” The task assigned to Gibraltar force was warfare in enemy’s rear with a view to create conditions of armed insurrection leading to liberation of Kashmir or at least parts of it. Additionally, Ayub wanted 12 Division to capture Akhnur under codename Op ‘Grand Slam’ because Akhnur had a single Class 18 bridge on the fast flowing Chenab River which was the key to Indian communications from Jammu and a group of valleys lying south of the Pir Panjal Range and West of Chenab River, the bridge being the lifeline of Indian forces defending Ponch, Rajouri, Jhangar, Naushera and Chhamb-Dewa.
The task assigned to Gibraltar force was warfare in enemy’s rear with a view to create conditions of armed insurrection leading to liberation of Kashmir or at least parts of it
War Breaks Out
Gibraltor Force commenced infiltration in early August 1965 with five subdivisions tasked for specific areas; Srinagar Valley; Mendhar-Rajouri area; Dras-Kargil area; Naushera-Sundarbani and; Bandipura-Sonarwain. The Salahuddin Force for Kashmir Valley had separate task forces specifically tasked for Qazinag-Naugam, Tithwal-Tangdhar, Gurais and Kel-Minimarg. Each of these task forces was commanded by Captain level officers of the SSG or Pakistani Army. Chhamb, Naushera and Rajouri were subjected to artillery fire to support infiltration. On August 19, Pakistani guns moved close to the ceasefire line (CFL) and began shelling Indian positions near Tithwal, Uri and Ponch. India’s response was quick capturing areas up to Kishenganga River in Tithwal Sector; Rishmar Ridge, Pir Sahiba feature, Sunjoi feature, Ring Contour overlooking Mirpur bridge and then Point 9013 giving our troops complete domination of the Mirpur area right up to the bridge at Jura on River Kishenganga cuting off the routes for further infiltration into the Gurez Valley and Tithwal Sector. Simultaneously, Point 13620 was captured in Kargil Sector. Next was the capture of Haji Pir Pass.
Battle of Haji Pir
Haji Pir Pass was dominated by three neighbouring hill features; on the East by Bedori (3,760 m), on the West by Sank (2,895 metres) and Ledwali Gali (3,140 m) to the South-West. It was considered essential to seize these posts before proceeding to the Haji Pir Pass (2,673 m). Bedori was situated 14 km south-east of the CFL and Haji Pir Pass 10 km south-west of Bedori. It was apparent that capture of the Haji Pir Pass would necessitate large-scale pincer movement capturing these features without giving time to the enemy to regroup and bring reinforcements; one thrust along general axis Uri-Haji Pir Pass, in combination with second thrust from the South via the Ponch-Kahuta approach. It was appreciated that the link-up between these forces would cut off all routes of approach into the crucial area of the Haji Pir Bulge. The responsibility for the northern thrust along axis Uri-Haji Pir Pass was given to 19 Infantry Division with 68 Infantry Brigade under command for this task, latter built up to five infantry battalions; 1 Para, 19 Punjab, 4 Rajput, 6 Jak Rif and 4 Sikh Li. The Brigade had five artillery fire units. 68 Infantry Brigade operation was codenamed Op ‘Bakshi’ after the name of the Brigade Commander, Brig (later Lt General) Z.C. Bakshi. The southern thrust along axis Ponch-Kahuta approach was assigned to 25 Infantry Division with 93 Infantry Brigade to undertake the operation under codename Op ‘Faulad’.
Brigadier Bakshi assessed enemy opposition totalling some three-and-a-half battalions in well prepared defences having coordinated MMGs and LMGs. He decided on a two-pronged simultaneous attack; left prong along Uri-Sank-Ledwali Gali-Haji Pir Pass and right prong along Uri-Bedori-Kuthnar Di Gali-Kiran-Haji Pir Pass. The operations of the left and right prongs were entrusted to 1 Para and 19 Punjab respectively. The entire operation was planned in three phases with H Hour as 2200 hours on August 24. In Phase 1, 19 Punjab was to capture Ring Contour and Pathra by 0100 hours on August 25, while 1 Para was to capture Sank Ridge upto Ledwali Gali and Sawan Pathri by 0500 hours on August 25. In Phase 2, 19 Punjab was to capture Bedori and Kuthnar Di Gali by 0600 hours on August 25, while securing the ring contours and capturing Haji Pir Pass was to be undertaken by 4 Rajput by 1200 hours on August 25. Phase 3 required mopping up of the area by 19 Punjab with under command one company of 4 Rajput. 4 Sikh Li and 6 Jak Rif were to provide troops for the fire bases for the operation and 6 Jak Rif was also tasked to hold captured territory.
The time schedule for Op ‘Bakshi’ was delayed by 24 hours due to bad weather and relief of attacking troops. Tasking 4 Rajput was changed to move behind 19 Punjab along the right prong instead of the original plan to move behind 1 Para in the left prong. 1 Para under Lt Colonel Prabhjinder Singh, was to attack along the left prong to capture three intermediate features namely Sank (also known as Point 9591), Sar and Ledwali Gali, while 19 Punjab was to advance along the left flank and capture Bedori, the prominent feature east of Haji Pir Pass. Once the latter was taken, 4 Rajput was to pass through and make for the final objective, of Haji Pir Pass while 6 Jak Rif was to hold captured territory. The operation commenced at 2150 hours on August 25 on schedule as per the new plan preceded by shelling enemy positions. 1 Para launched the pre-dawn attack on Sank Ridge with two company strength reaching the base of Sank but the approach to the ridge was very difficult and the heavy rains of the previous night had made it very slippery. The progress became very slow because of which the attack got daylighted. Sank stood on the enemy’s axis of communications from Bagh to Bedori and was held by a Company of Rangers supported by mortars. The enemy held fire till the leading troops reached within 45 metres of the perimeter fencing and then opened up with all his weapons. The battle continued close to the fenced trenches of the enemy till 0930 hours when the effort was called off.
The second attack by 1 Para was pressed home at 2230 hours on August 26. ‘B’ Company led by Major (later Lt General) Ranjit Singh Dyal charged up the slopes of Sank followed by ‘D’ Company, supported by artillery fire. Enemy troops rushed forward from their trenches and opened fire with MMGs, LMGs and other small arms but effective fire from the attackers forced the enemy to fall back to his trenches. By 0430 hours on August 27, ‘B’ Company had reached within 450 metres of the enemy positions, where they formed up in front of the enemy positions at Sank and charged frontally. In a daring platoon attack, enemy MMGs and LMGs were silenced as closing up troops showered enemy emplacements with grenades and bullets. The enemy withdrew to Sar and Ledwali Gali features leaving 16 dead but managed to evacuate about 100 wounded. 1 PARA soon captured Sar and advanced upon Ledwali Gali where the enemy made the last stand to facilitate withdrawal of his troops from surrounding areas by 1100 hours. ‘B’ Company meanwhile had secured Sawan Pathri and Agiwas by 1400 hours in face of minor opposition. ‘C’ Company which had in the meantime reached Sank was ordered to clear area South of Sank including Point 10033, which it successfully did by last light. 1 PARA had thus captured the objectives allotted to it by 68 Mountain Brigade.
The progress along the right prong (Uri-Bedori-Kuthnar Di Gali-Kiran-Haji Pir Pass) had not kept pace with the left prong, So, CO 1 PARA requested the Brigade Commander that his battalion be permitted to go for Haji Pir Pass. With right flank of the Pass still not secured, the only chance of success to capture Haji Pir Pass lay in a frontal attack through a re-entrant that ran North of it. The risk was that the advance would be under observation of the enemy but Brigadier Bakshi gave the green signal to 1 Para. A company column was quickly formed under Major Ranjit Singh Dyal and tasked to capture the Haji Pir Pass. The final approach involved a climb of over 1,220 metres by night. The force starting from Ledwali Gali was to infiltrate through Hyderabad Nullah on night August 27/28 and capture Ring Contours 1194 and 1094 to proceed further.
Descending into Hyderabad Nullah at 1530 hours the column came under direct enemy fire but silenced it with quick physical platoon action. The troops had been in continuous operations for over two days and further move was in heavy rain and under artillery shelling. By 1900 hours it was completely dark and Major Dyal decided to climb directly to the Pass, capturing 10 personnel of Azad Kashmir militia with weapons along the way. At 0430 hours, the company hit the old Uri-Ponch Road and reached 700 metres short of the Pass at 0900 hours. The enemy was surprised but opened up with MMG from the Western shoulder of the Pass and with LMG and rifle fire from the Pass itself. Major Dyal ordered two platoons to climb up the spur, assault the enemy from the western side of the Pass and then roll down to the Pass. The enemy could not withstand this daylight daring attack and withdrew in confusion to a feature to the west of the Pass. By 1000 hours on August 28 the formidable Pass fell to the column and Major Dyal radioed back capture of Haji Pir Pass. This remarkable achievement was possible because of excellent leadership, the element of surprise and ability of the Battalion to quickly regroup and continue attacking. Enemy did regroup and launched several counter-attacks but 1 Para pressed on and captured more areas including NR 1092 and Point 8786. Eventually, 19 Punjab linked up on September 1.
Aftermath
The capture of the Haji Pir Pass restored the Uri-Ponch road link and the strategic Jammu-Rajouri-Srinagar road, which had been in disuse since 1947, became functional again. Unfortunately, under the Russian brokered Tashkent Accord signed on January 16, 1966, Indian and Pakistani forces withdrew to their respective positions as prior to August 5, 1965 and the Haji Pir Pass was returned to Pakistan. Prime Minister Lal Bahadur Shastri signed the accord in good faith. He was scheduled to meet Ayub Khan next day to extract latter’s promise never to use force again, but he tragically passed away during the night, media hinting possible conspiracy at international level. The hero of capture of Haji Pir, Lt General Ranjit Singh Dyal awarded Maha Vir Chakra in 1965, said in an interview during 2002, “The Pass would have given India a definite strategic advantage….It was a mistake to hand it back….our people don’t read maps.”
SP's Land Forces - CURRENT ISSUE